
 Pin
Pin
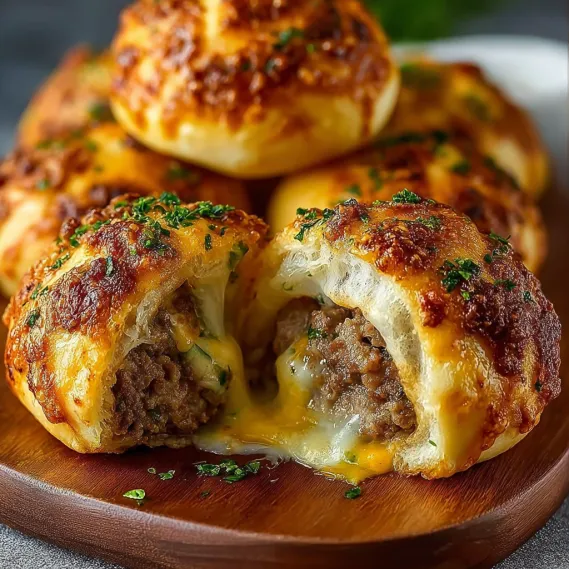
This garlic parmesan cheeseburger bombs recipe transforms everything you love about a classic cheeseburger into a perfectly portioned, handheld bite that's oozing with cheese and packed with flavor. I created these when my teenagers had friends over unexpectedly, and they disappeared faster than I could make them.
I first made these during a football Sunday when we needed something more substantial than chips but less formal than a sit-down meal. Now they're requested at nearly every gathering we host.
Ingredients
- Ground beef: forms the hearty base consider using 80/20 for juicier bombs
- Cheddar cheese cubes: create those irresistible melty pockets choose sharp cheddar for more flavor
- Soft dinner rolls: act as the perfect vessel look for brioche or potato rolls for extra richness
- Butter: creates that golden exterior and carries the garlic flavor use unsalted to control saltiness
- Fresh garlic cloves: provide aromatic punch mince them just before using for maximum flavor
- Parmesan cheese: adds that nutty salty crust that elevates these beyond basic burgers
- Fresh parsley: brightens the rich flavors and adds color
- Salt and pepper: balance and enhance all the flavors
Step-by-Step Instructions
- Preheat Oven:
- Set oven to 375°F allowing proper time to fully preheat for even cooking. Line a baking sheet with parchment paper to prevent sticking and make cleanup easier.
- Cook the Beef:
- Brown ground beef in a skillet over medium heat until no pink remains about 6 to 8 minutes. Break it into small crumbles as it cooks for easier filling. Season thoroughly with salt and pepper then drain excess fat to prevent soggy bombs.
- Prepare the Rolls:
- Carefully slice the tops off each dinner roll creating a lid. Gently hollow out the centers using your fingers or a small spoon leaving about a 1/4 inch border all around to maintain structural integrity.
- Create the Cheese Base:
- Place a cube of cheddar or a generous pinch of shredded cheese into the bottom of each hollowed roll. This creates a barrier that helps prevent the bread from getting soggy and ensures cheese in every bite.
- Fill with Beef:
- Spoon the seasoned ground beef into each roll pressing down gently to pack it in while leaving a small space at the top. The beef should be warm but not hot enough to melt the cheese immediately.
- Add More Cheese:
- Top the beef layer with additional cheese for maximum meltiness. This double layer of cheese ensures that perfect pull when you bite into the bombs.
- Create Garlic Butter:
- Mix melted butter with freshly minced garlic in a small bowl until well combined. The warm butter helps distribute the garlic flavor evenly across all the rolls.
- Brush the Tops:
- Using a pastry brush generously coat the top of each roll with the garlic butter mixture getting into all the nooks and crannies for maximum flavor distribution.
- Add Final Toppings:
- Sprinkle each buttered roll with parmesan cheese and chopped fresh parsley. The parmesan will create a delicious crust while baking and the parsley adds freshness and color.
- Bake to Perfection:
- Arrange the prepared rolls on your parchment lined baking sheet with a little space between each. Bake for 15 to 18 minutes until the tops are golden brown and the cheese inside is completely melted.
- Rest and Serve:
- Allow the bombs to cool for 3 to 5 minutes before serving. This brief rest helps the cheese set slightly so it doesnt completely run out with the first bite.
My favorite part of this recipe is watching peoples faces when they take their first bite and discover the melty cheese center. My husband calls them dangerously addictive and always claims the last one.
Make It Your Own
These cheeseburger bombs are incredibly versatile. Try adding cooked bacon bits to the beef mixture for a bacon cheeseburger variation. You could also mix in sautéed mushrooms or caramelized onions for added depth of flavor. For spice lovers a dash of hot sauce or diced jalapeños in the beef takes these to another level. I sometimes set out small bowls of ketchup mustard and relish so everyone can dip their bombs according to their preference.
Storage and Reheating
Store any leftover cheeseburger bombs in an airtight container in the refrigerator for up to 3 days. To reheat place them on a baking sheet in a 350°F oven for about 10 minutes or until heated through. Avoid using the microwave as it will make the bread soggy and rubbery. The oven ensures the outside stays crisp while the inside gets hot and melty again. These also freeze beautifully simply cool completely wrap individually in plastic wrap then foil and freeze for up to 2 months.
Perfect Pairings
These bombs are substantial enough to serve as a main dish alongside a simple green salad or some sweet potato fries. For a party spread pair them with other finger foods like vegetable platters or chips and dip. I love serving these with a cold beer for adults or sparkling lemonade for the kids. The brightness of the beverage cuts through the richness of the cheese and beef creating a balanced meal experience.
Common Questions About This Recipe
- → How do I keep the rolls from tearing when hollowing?
Allow the rolls to come to room temperature before hollowing out the centers. This softens the bread, making it easier to handle without tearing.
- → Can I prepare Cheeseburger Bombs ahead of time?
You can assemble the bombs and refrigerate them, then bake just before serving for best flavor and texture. Brush with garlic butter and add parmesan right before baking.
- → What’s the best cheese to use?
Cheddar is classic for rich flavor and meltiness, but you can also use mozzarella, Monterey Jack, or a blend for extra gooeyness.
- → How do I reheat leftovers for the best texture?
Reheat in an oven at 350°F until warmed through to keep the rolls crispy. Avoid the microwave since it can make the bread soggy.
- → Can I freeze Cheeseburger Bombs?
Yes, wrap the unbaked or baked bombs individually and freeze. Thaw overnight and bake until hot and golden before serving.