
 Pin
Pin
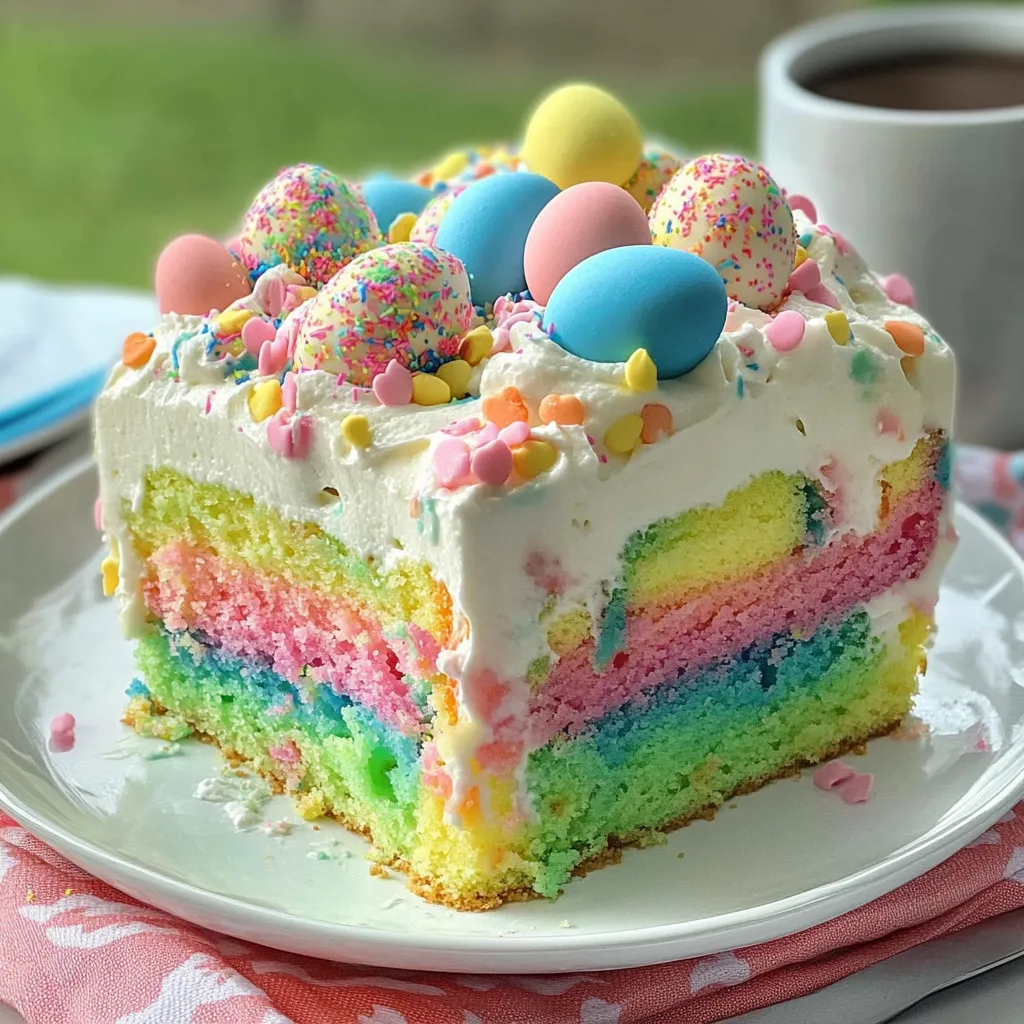
This Easter Poke Cake transforms a simple box mix into a showstopping holiday dessert that's guaranteed to impress your guests. The vibrant swirled colors peek through each slice, making it as beautiful as it is delicious. The combination of moist cake, creamy pudding, and fluffy whipped cream creates the perfect texture contrast in every bite.
I first made this cake for my niece's spring birthday party, and the colorful swirls delighted the children so much that it's now our official Easter tradition. The wide eyes and gasps when I cut the first slice make the small effort completely worth it.
Ingredients
- White cake mix: Creates the perfect canvas for our colorful masterpiece with a neutral flavor that lets the pudding shine
- Box ingredients: Usually eggs, water and oil ensure proper cake texture
- White chocolate instant pudding: Adds creamy sweetness and keeps the cake incredibly moist
- Milk: Activates the pudding and creates the perfect filling consistency
- Heavy cream: Whips into a cloud like topping that balances the sweetness
- Powdered sugar: Sweetens the whipped cream without any graininess
- Vanilla extract: Adds depth of flavor to the whipped topping
- Food coloring: Creates the gorgeous Easter palette that makes this cake special
- Sprinkles (optional): Add a festive finishing touch that delights kids
Step-by-Step Instructions
- Prepare Your Baking Dish:
- Preheat your oven according to the box directions which is typically 350°F. Thoroughly grease a 9×13 inch baking dish ensuring you cover the corners well. The greased surface helps your colorful batter spread properly.
- Mix Your Base Cake:
- Prepare the white cake mix exactly as directed on the box. Measure ingredients precisely as the ratio affects both texture and baking time. A smooth, lump free batter gives the best color distribution.
- Create Your Colorful Batters:
- Divide the prepared batter equally between four bowls. Add food coloring to each bowl one for blue, green, pink, and yellow. Start with just a few drops and gradually add more until you achieve vibrant Easter colors. Stir thoroughly to eliminate any color streaks.
- Create The Marble Effect:
- Working quickly, drop spoonfuls of each colored batter into the greased baking dish, spacing them a few inches apart. Continue with each color until you've used all the batter, building layers. Tap the pan firmly on the counter several times to release air bubbles and level the surface. Use a toothpick to create gentle swirls without overmixing the colors.
- Bake The Cake:
- Bake according to box directions until a toothpick inserted in the center comes out clean. This is usually 25 to 30 minutes. Overbaking will create a dry cake that won't absorb the pudding properly.
- Create The Poke Holes:
- Allow the cake to cool for about 10 minutes then use the handle end of a wooden spoon to poke holes throughout the entire cake surface, spacing them about an inch apart. Make sure to press all the way to the bottom of the cake to allow maximum pudding absorption.
- Prepare And Add The Pudding Layer:
- Whisk together the instant white chocolate pudding and milk until completely smooth with no powder lumps. Pour this mixture over the still warm cake before the pudding sets completely, ensuring it fills all the holes. Use the back of a spoon to guide pudding into holes if needed. Spread any remaining pudding evenly across the top.
- Chill The Filled Cake:
- Refrigerate the cake until the pudding is completely set usually at least 2 hours. This step is crucial for proper texture development and ensures clean slices when serving.
- Add The Whipped Topping:
- In a chilled bowl, whip the heavy cream and vanilla until soft peaks form. Add powdered sugar gradually while continuing to whip until stiff peaks form. Spread this fluffy layer over the chilled cake creating decorative swirls if desired.
- Final Decoration:
- Add festive sprinkles just before serving to prevent them from bleeding colors into your beautiful white topping. Choose sprinkles in Easter colors to enhance the theme.
My favorite part of this recipe is watching the cake transform from simple to spectacular when the pudding seeps into those poke holes. I remember my grandmother teaching me that the secret to a great poke cake is patience letting each layer set properly before adding the next. Her wisdom holds true with each perfect slice.
Make It Your Own
This cake welcomes customization based on your preferences. Try lemon pudding instead of white chocolate for a citrusy spring flavor. For chocolate lovers, a chocolate cake base with chocolate pudding creates a decadent alternative while still maintaining those beautiful color swirls. You could even change the food coloring to match any holiday or team colors for birthday celebrations.
Storage Tips
Keep this cake refrigerated at all times due to the dairy content. Cover loosely with plastic wrap rather than airtight to prevent the whipped topping from sticking. The cake actually improves after a day in the refrigerator as the flavors meld together beautifully. For the freshest presentation, consider adding the whipped topping and sprinkles just before serving if preparing more than a day ahead.
Perfect For Beginners
This Easter Poke Cake is ideal for novice bakers or cooking with children. The forgiving nature of the marbling technique means there's no such thing as a mistake just a unique design. Kids particularly enjoy the poking process and watching the pudding disappear into the holes. The dramatic reveal when slicing makes even beginning bakers feel accomplished when guests express their delight.
Serving Suggestions
Serve this colorful cake slightly chilled for the best texture. A warm cup of coffee or tea creates a lovely contrast to the cool, creamy dessert. For extra indulgence, offer additional toppings like warmed berry sauce, chocolate drizzle, or toasted coconut that guests can add according to preference. Individual slices look especially beautiful on white plates where the colors truly pop.
Common Questions About This Recipe
- → How can I achieve vibrant swirls for the cake?
Divide the batter evenly into four bowls, mix in different food colors, and drop spoonfuls of each color into the pan one at a time. Swirl gently with a toothpick for the best effect without overmixing.
- → What type of food coloring works best?
Gel food coloring works best as it produces bold and vibrant colors without thinning the cake batter. Liquid food coloring can also work but may require more drops for similar intensity.
- → Can I use other pudding flavors?
Yes, feel free to substitute white chocolate pudding with vanilla or another preferred flavor to suit your taste while ensuring it complements the cake's overall sweetness.
- → How long should the cake set in the fridge?
Allow the cake to set in the fridge for at least 2-4 hours to ensure the pudding has fully absorbed into the cake and the layers have firmed up.
- → Can I make the whipped topping in advance?
Yes, you can whip the cream and store it in an airtight container in the fridge for up to one day before spreading it over the cake. Make sure to mix lightly if it settles.
- → How should the cake be stored?
Store the cake covered in the refrigerator for up to three days to keep it fresh. Avoid leaving it at room temperature for long periods to maintain its texture.