
 Pin
Pin
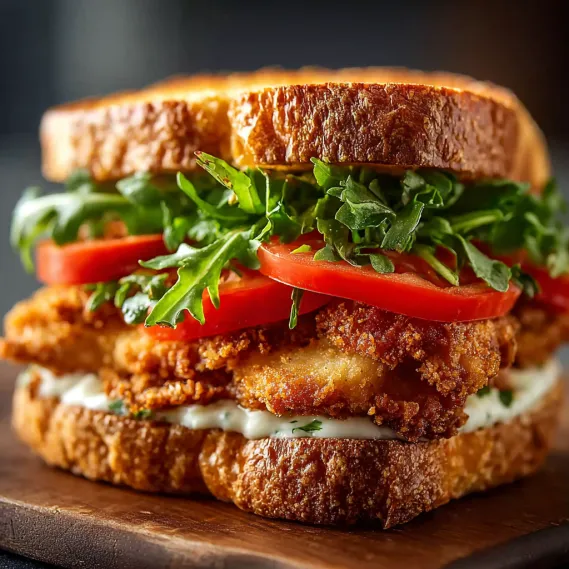
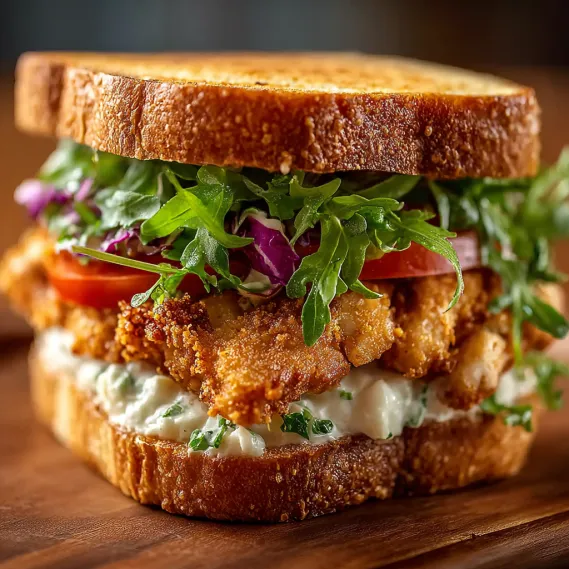
This creamy deli-style chicken sandwich recipe transforms ordinary ingredients into something extraordinary. The secret lies in finely shredding the chicken until it becomes almost fluffy, creating a texture that's irresistibly smooth when combined with the tangy sauce. Each bite delivers perfect balance between creamy filling and soft bread.
I first served these at my daughter's graduation party as finger sandwiches, and they disappeared faster than anything else on the table. Now they're my go-to solution whenever someone drops by unexpectedly or when I need a reliable crowd-pleaser.
Ingredients
- Cooked chicken: About 1 pound provides the perfect protein base while allowing other flavors to shine through. Rotisserie chicken saves time and adds extra flavor
- Celery: A single stalk adds essential crunch and subtle freshness that prevents the filling from becoming one-dimensional
- Green onion: Provides mild onion flavor without overwhelming the delicate balance of the sandwich
- Walnuts: Optional but highly recommended for their buttery crunch and slight bitterness that cuts through the creaminess
- Dill pickle: The secret ingredient that adds tangy brightness to every bite, choose cornichons for a more refined flavor
- Fresh dill: Optional but adds a wonderful aromatic quality that elevates the entire sandwich
- Mayonnaise: Creates the creamy base for the filling, choose a good quality mayo for best results
- Sour cream: Adds tanginess and lightens the texture of the filling
- Dijon mustard: Provides subtle heat and depth without dominating the flavor profile
- Lemon juice: Brightens everything up with essential acidity
- Spices: Simple pantry staples like onion powder, garlic powder, salt and pepper create a perfectly balanced filling
- Soft sandwich bread: The canvas for your creation, choose according to your preference
Step-by-Step Instructions
- Shred the Chicken Ultra Finely:
- Place your cooked chicken in a stand mixer with the paddle attachment and mix on medium speed for about 1 minute until the chicken breaks down into very fine shreds. This step is crucial for achieving that classic deli texture. If using your hands, pull the chicken apart as finely as possible, almost working it between your fingers. The finer the shred, the creamier your final result.
- Mix the Sauce:
- Combine mayonnaise, sour cream, Dijon mustard, lemon juice, onion powder, garlic powder, salt, and pepper in a medium bowl. Whisk thoroughly until completely smooth with no streaks remaining. Taste and adjust seasonings if needed. The sauce should taste slightly more seasoned than you think necessary as the chicken will dilute the flavors.
- Combine the Filling:
- Transfer your finely shredded chicken to a large mixing bowl. Pour the prepared sauce over the chicken and fold gently with a spatula until every piece of chicken is coated. Add the diced celery, sliced green onion, chopped walnuts, diced pickles, and fresh dill. Continue folding until all ingredients are evenly distributed throughout the mixture. Avoid overmixing which can make the texture pasty.
- Butter the Bread:
- Lay out all your bread slices on a clean work surface. Spread a thin, even layer of softened butter all the way to the edges of each slice. This creates a moisture barrier that prevents the bread from becoming soggy, especially important if making these ahead of time.
- Build Your Sandwiches:
- Using a spoon or offset spatula, spread a generous layer of chicken filling from edge to edge on half of your buttered bread slices. The filling should be about half an inch thick for the perfect filling to bread ratio. If desired, remove the crusts using a sharp knife for a more elegant presentation.
- Slice and Chill:
- Cover each filled slice with another piece of buttered bread, butter side down. If time allows, wrap the assembled sandwiches in plastic wrap and refrigerate for 1 to 2 hours. This firms up the filling and makes for cleaner, more precise cuts. Using a sharp knife, cut each sandwich into triangles, rectangles, or squares depending on your preference.
- Serve:
- Arrange your cut sandwiches on a serving platter for an impressive presentation. If serving as part of a meal, pair with a light soup or crisp side salad for balance.
The first time I made these sandwiches, I was skeptical about spending time shredding the chicken so finely. I nearly skipped that step but decided to follow through. The difference was remarkable my family immediately noticed how the texture transformed what could have been an ordinary sandwich into something special. That extra five minutes of effort makes all the difference.
Storage Success
These sandwiches keep remarkably well when properly stored. For best results, wrap assembled sandwiches tightly in plastic wrap, then place in an airtight container in the refrigerator for up to 48 hours. The butter barrier helps prevent sogginess, but for maximum freshness, I recommend assembling just a few hours before serving.
If you need to prepare further in advance, make only the filling and store it separately from the bread. The chicken mixture keeps beautifully for up to 3 days in the refrigerator, allowing you to assemble fresh sandwiches whenever needed. Just give it a quick stir before spreading, as some liquid separation is natural.
Creative Variations
This recipe functions beautifully as a template for countless variations. For a Mediterranean twist, add chopped olives, roasted red peppers, and substitute the dill with basil. Create an autumn harvest version by incorporating dried cranberries and swapping walnuts for pecans.
The sauce base works wonderfully with other proteins too. Try using canned tuna or salmon for a seafood version, or roasted and diced firm tofu for a vegetarian alternative. The technique remains the same fine shredding creates the perfect texture no matter which protein you choose.
For gluten-free guests, this filling works beautifully in lettuce cups or as a topping for cucumber rounds. The versatility makes it perfect for accommodating various dietary needs without creating separate dishes.
Presentation Ideas
Elevate these sandwiches from casual to elegant with thoughtful presentation. For afternoon tea service, cut crusts off completely and slice into neat fingers or triangles. Arrange on a tiered serving platter interspersed with fresh herbs or edible flowers.
For a family-style meal, keep the sandwiches whole or cut into halves, then arrange on a wooden board alongside pickles, potato chips, and fresh fruit for a complete meal that invites everyone to help themselves.
When packing for picnics or lunches, wrap individual sandwiches in parchment paper tied with twine, or stack triangle cuts in a container with parchment between layers to prevent sticking. The filling is stable enough to travel well without becoming soggy.
Common Questions About This Recipe
- → How do I make the filling ultra-creamy?
Finely shred the chicken using a mixer or your hands, then combine with the smooth mayo-sour cream sauce for the creamiest texture.
- → Can I prepare the sandwiches in advance?
Yes, you can make the filling ahead of time. Assemble sandwiches just before serving to keep the bread fresh and soft.
- → Are there dairy-free options?
Swap out sour cream for a dairy-free yogurt and choose egg-free mayonnaise for a completely dairy-free and egg-free version.
- → What bread works best for this sandwich?
Soft white sandwich bread is traditional, but whole grain, ciabatta rolls, or even lettuce wraps work well for a modern twist.
- → Can I customize the mix-ins?
Absolutely! Omit walnuts for nut-free, replace pickles with cornichons, or swap herbs to suit your taste preferences.
- → How can I prevent the bread from getting soggy?
Lightly buttering each bread slice forms a barrier, helping maintain the bread's texture after assembly.