
 Pin
Pin
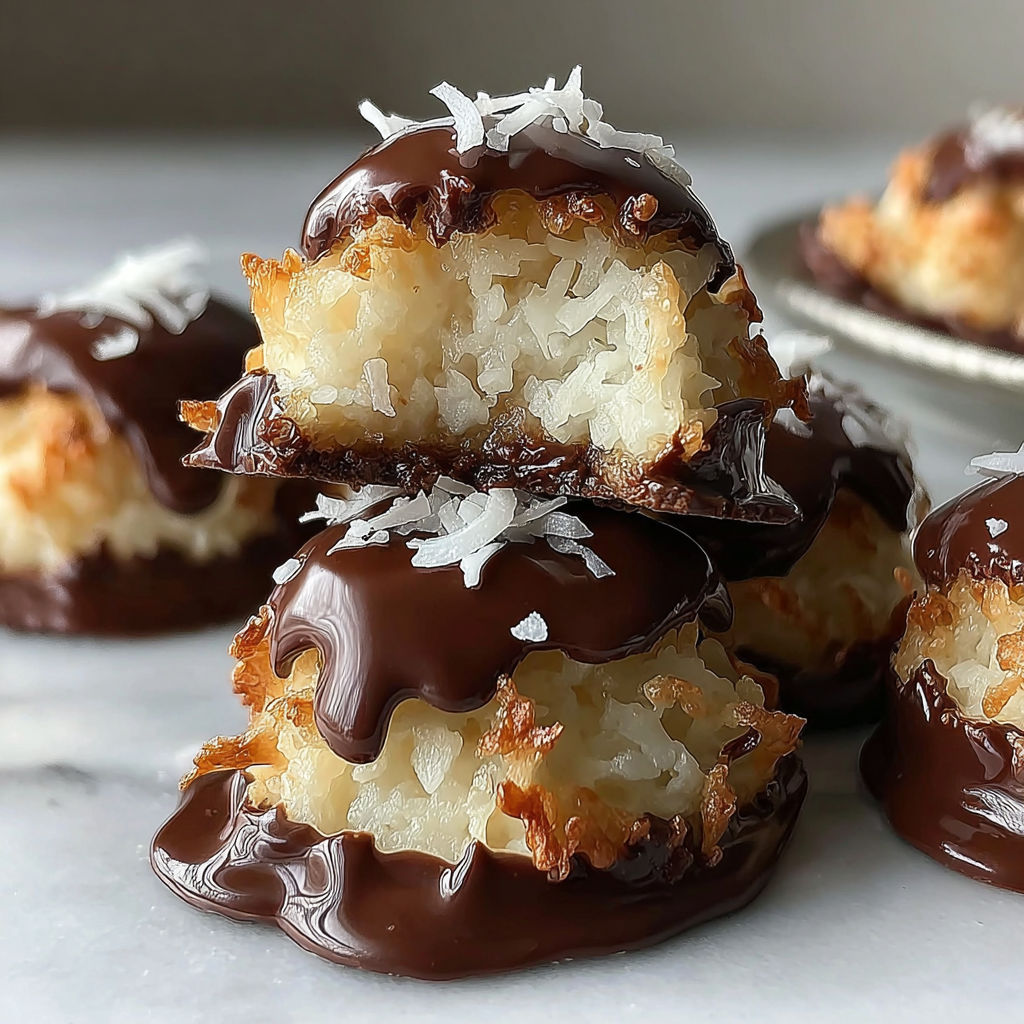
Chocolate kissed coconut macaroons instantly make any gathering feel special, and this easy coconut macaroon recipe is approachable for even beginner bakers searching for a quick dessert to impress. With just 15 minutes of prep and 15 minutes of baking, these chewy coconut cookies are ready in only 30 minutes, delivering bakery style treats using simple pantry staples like sweetened shredded coconut, chocolate kisses, and sweetened condensed milk.
I first made these coconut chocolate kiss macaroons for my daughter’s school bake sale, and they turned into our annual holiday tradition after disappearing from the table almost instantly. The rich coconut flavor and melty chocolate centers make these cookies irresistible, and everyone from kids to adults requests them for family gatherings. Making these bakery style coconut treats is a fun, low effort way to create special memories in the kitchen each season.
Gather Your Ingredients
- Sweetened shredded coconut for coconut macaroons: Provides signature chewy texture and natural sweetness; choose a fresh, moist bag for the best results and do not substitute unsweetened coconut unless adjusting other ingredients
- All-purpose flour for binding: Helps macaroons hold their shape and stay chewy as they bake; a one to one gluten free blend can be used for gluten free coconut macaroons
- Sweetened condensed milk: Delivers creamy richness, binds the dough and helps the cookies stay soft; use coconut condensed milk for a dairy free alternative
- Milk chocolate kisses: Create the signature melty chocolate centers; substitute dark chocolate, almond, or vegan kisses for flavor or dietary needs
- Vanilla extract: Boosts coconut flavor and adds a bakery style aroma; try a splash of almond extract for extra nuance
- Salt: Balances sweetness and enhances the flavors of coconut and chocolate; do not omit for well rounded taste
How to Make Chocolate Kissed Coconut Macaroons
- Preheat the Oven and Prep Your Pan:
- Set your oven to 350°F at the start and line baking sheets with parchment paper or lightly grease them. This keeps the macaroons from sticking and ensures crisp golden bottoms that lift off cleanly after baking.
- Combine Dry Ingredients for Cohesive Texture:
- In a large mixing bowl, thoroughly stir together the sweetened shredded coconut, all-purpose flour, and salt. Mixing well prevents any dry flour pockets and guarantees every macaroon has an even chew with the proper structure.
- Add Condensed Milk and Vanilla for a Sticky Dough:
- Pour in the entire can of sweetened condensed milk and the vanilla extract. Mix until all the coconut is coated and the dough holds together when pressed with a spoon, which is crucial for easy scooping and uniform baking.
- Shape the Macaroons for Uniform Baking:
- Use a tablespoon or cookie scoop to drop rounded mounds of dough onto the prepared baking sheet. Leave about one inch between each macaroon and gently press to form a round shape without compacting them tightly, keeping centers tender and chewy.
- Bake Until Golden with Chewy Centers:
- Bake on the center rack for 12 to 15 minutes, watching closely for richly golden brown edges and tops while the centers remain pale. This balance prevents overbaking which can lead to dry cookies; check at 12 minutes if your oven runs hot.
- Cool Briefly to Set Structure:
- Remove trays from the oven and let the macaroons cool on the sheet for about 2 minutes. This step allows the cookies to firm up, making them less likely to break or stick when transferring to a rack.
- Press in the Chocolate Kisses for a Finishing Touch:
- When the cookies are still warm but no longer piping hot, gently press a chocolate kiss into the center of each. The warmth will melt the base of the chocolate just enough to secure it, but waiting prevents the chocolate from melting too quickly or losing shape.
- Let Them Cool and Enjoy:
- Allow the macaroons to cool completely on a wire rack so the chocolate can firm up again, giving the ideal contrast between a creamy center and chewy coconut texture when serving.

The first time I swapped in dark chocolate kisses instead of milk chocolate, the bittersweet chocolate balanced the sweetness of the coconut perfectly and became my favorite version for adult gatherings. My kids always want to unwrap the chocolate kisses and press them into the warm coconut cookies as their special job, making assembly a fun family project. Each macaroon delivers the best of both worlds with a melty, chocolate center and lightly crisp, golden coconut outside, and they are easy enough to make for lunchbox treats or impromptu celebrations.
Smart Swaps and Variations
These coconut chocolate macaroons are incredibly versatile if you need to adapt for dietary needs or preferences. For a gluten free option, simply use a one to one gluten free flour in place of all-purpose, or for a dairy free version, replace regular sweetened condensed milk and chocolate kisses with coconut condensed milk and vegan chocolate. Lower the sugar by choosing unsweetened coconut and adding an extra tablespoon of condensed milk to maintain moisture, and consider a pinch more salt to keep the flavor balanced for less sweet results.
How to Store and Reheat Chocolate Kissed Coconut Macaroons
Proper storage helps these chocolate kissed coconut macaroons keep their chewy texture and rich flavor for days. After cooling, place the cookies in a sealed, airtight container at room temperature for up to five days. For longer storage, arrange cookies in layers with parchment or wax paper between them in a freezer safe container, and keep frozen for up to three months. To enjoy leftovers, let them come to room temperature for 30 minutes for best texture, or microwave a single cookie for 8 seconds to soften the chocolate center.
What to Serve with Chocolate Kissed Coconut Macaroons
Chocolate kissed coconut macaroons are perfect on a holiday cookie tray, for school bake sales, or as a sweet finish to a family dinner. They pair beautifully with platters of fresh berries, tangy citrus bars, or chocolate dipped strawberries on a dessert buffet. For a cozy gathering, serve with hot cocoa, rich coffee, or a sweet after dinner wine, or present them stacked on a festive plate for parties and celebrations.
Nutritional Benefits
Chocolate kissed coconut macaroons deliver not only delicious flavor but also some nutritional perks, thanks to the use of coconut. Each cookie includes healthy fats and natural fiber that are more filling than standard cookies, and the base recipe is nut free by design. Options for gluten free flours and dairy free chocolate mean almost everyone can enjoy these homemade cookies without worry about common allergens.
Recipe Success Tips
Success with chocolate kissed coconut macaroons comes down to a few key techniques. If your dough seems too dry because the coconut is less moist, add a tablespoon of extra sweetened condensed milk. To keep cookies from spreading or flattening in the oven, chill the dough for 10 to 15 minutes before shaping. Always time your chocolate kiss placement so that the cookie is warm but not too hot, which helps the chocolate set perfectly without losing shape.

This chocolate kissed coconut macaroon recipe is the quickest way to bring smiles to your kitchen and create memorable moments around the dessert table. Try a new flavor twist or stick with the classic version, and watch these irresistible macaroons become your new family favorite.
Common Questions About This Recipe
- → Can I use unsweetened coconut instead of sweetened?
Yes, but the texture and sweetness will change. You may need to adjust the sweetness by adding a bit of sugar.
- → How do I prevent the macaroons from sticking?
Parchment paper or a lightly greased baking sheet helps the treats release easily after baking.
- → Can I use dark chocolate instead of milk chocolate?
Absolutely! Any variety of chocolate kisses can be used to suit your preference.
- → How should I store these coconut macaroons?
Keep them in an airtight container at room temperature for up to 5 days for best freshness.
- → Can I freeze coconut macaroons?
Yes, place in a freezer-safe container and freeze for up to 2 months. Thaw at room temperature before serving.