
 Pin
Pin
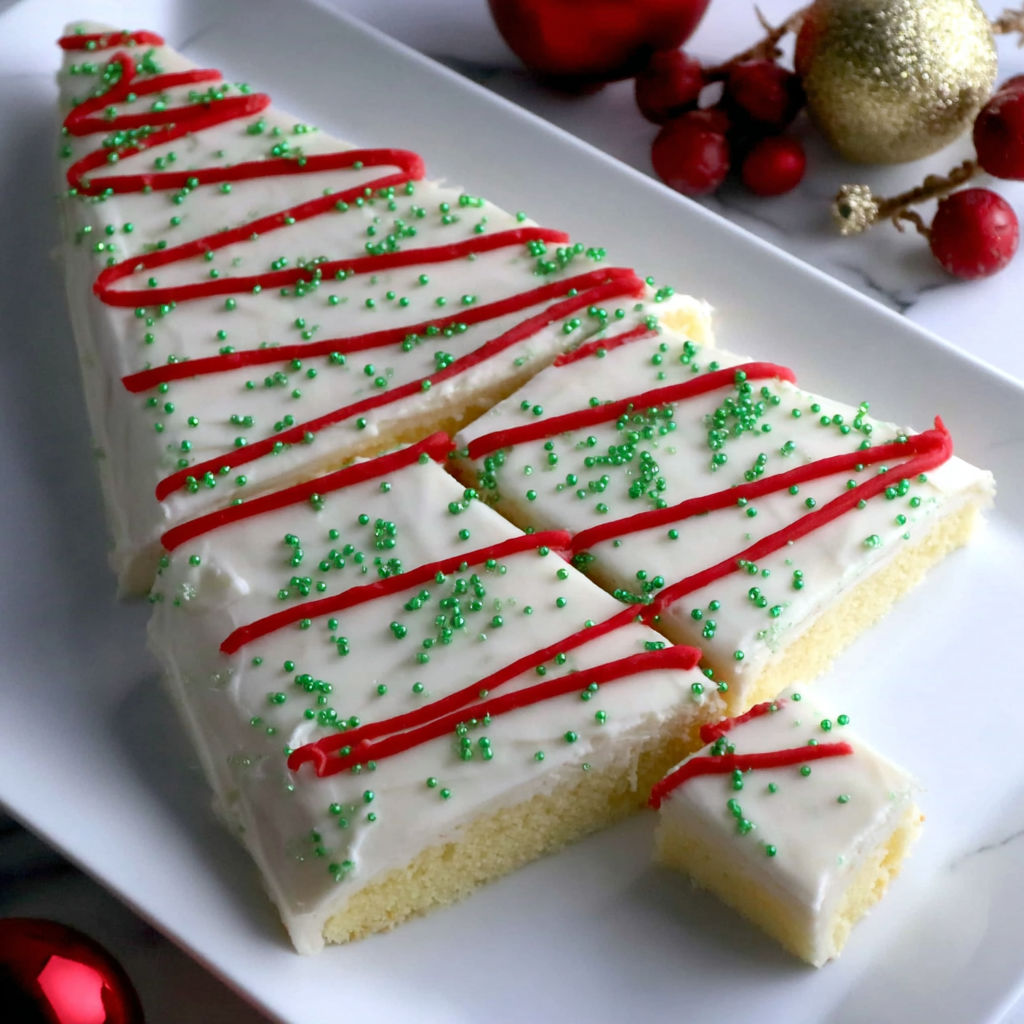
Nothing brings more delight to our December baking days than this homemade Little Debbie Christmas Tree Cake recipe. In just about 35 minutes of hands on prep and 30 to 45 minutes of baking, you can create a festive centerpiece that combines buttery soft cake layers with sweet vanilla frosting, all wrapped in nostalgic holiday charm. This easy Christmas Tree Cake not only tastes better than the store bought version, it lets you experience the seasonal joy of building and decorating your very own Christmas treat at home, making it the perfect party cake for holiday gatherings big or small.
I first made this Christmas Tree Little Debbie Cake for my kids’ school holiday party, and now it’s a December tradition that everyone expects—and loves. The soft, buttery cake paired with creamy homemade frosting layers always gets rave reviews, and even little hands can help decorate each tree for a fun and personal touch. It’s one of the easiest DIY food decorations we return to every holiday season, combining that nostalgic Christmas snack flavor with homemade comfort and creativity.
Gather Your Ingredients
- All purpose flour for Christmas Tree Cake: Gives the structure for soft, delicate cake; unbleached flour delivers better taste and texture. Substitute a 1 to 1 gluten free blend for gluten free cakes.
- Baking powder for lift: Ensures your cake bakes up fluffy with a high rise—check it’s fresh for best results. Level off your spoon for accurate measuring.
- Fine sea salt: Balances sweetness and enhances classic bakery notes; always use fine salt to evenly disperse flavor in the batter.
- Unsalted butter at room temperature: Creates a melt in your mouth crumb and rich buttercream. European style butters are worth the splurge for flavor; plant based butters work for non dairy needs.
- Granulated white sugar: Sweetens and helps the cake turn tender and light; choose pure cane sugar for best result.
- Large eggs, room temperature: Essential for structure and moisture; ensure eggs are at room temperature for an even cake batter.
- Pure vanilla extract: Delivers that signature Little Debbie Christmas Tree Cake flavor. Madagascar vanilla provides a deep, aromatic taste—imitation extract is not recommended.
- Buttermilk, room temperature: Adds richness and gentle tang, making the crumb extra moist and tender. Sub oat milk or almond milk with a splash of vinegar for dairy free cakes.
- Confectioner’s sugar (powdered sugar): Combines with butter to make a silky smooth frosting. Sift well before using to ensure lump free icing.
- Heavy whipping cream: Makes the buttercream creamy and easily spreadable; start with a few tablespoons and add more to reach the right consistency.
- Green sugar sprinkles: Add sparkle and holiday color. Coarse sanding sugar creates the most festive “tree” finish—crushed candy canes or gold sugar also work as fun alternatives.
- Red gel food dye: Creates the signature red garland look; gel color holds up best on creamy icing and won’t bleed before serving.
How to Make Little Debbie Christmas Tree Cake
- Prepare and Line Your Baking Pan:
- Preheat oven to 350 degrees F. Lightly grease a 9 by 13 inch rectangular pan and line with parchment paper, leaving enough overhang to lift the cake out after baking. This makes removing and cutting the cake shapes so much easier, ensuring your tree edges stay sharp.
- Mix Dry Ingredients for a Tender Crumb:
- In a medium bowl, whisk together 1 and a half cups all purpose flour, 2 teaspoons baking powder, and half a teaspoon fine salt. Whisk until just blended to avoid dense spots in your final cake layers.
- Cream Butter and Sugar Until Fluffy:
- In a large bowl, beat 1 cup room temperature unsalted butter with 2 cups granulated sugar on medium speed for 3 to 5 minutes until the mixture turns pale and fluffy—incorporating air here is key for a light vanilla cake. Look for a visibly increased volume and nearly dissolved sugar crystals.
- Add Eggs and Vanilla Gradually:
- Add four eggs one by one, mixing well after each, followed by 4 teaspoons vanilla extract. If the batter looks slightly separated after adding eggs, it will smooth out with the flour.
- Combine Wet and Dry Ingredients:
- Alternately add the flour mixture and 1 cup of buttermilk, beginning and ending with flour, mixing on low just until combined and smooth. Do not overmix or your cake could turn dense; the batter should be thick but pourable.
- Bake for Perfect, Even Layers:
- Spread batter evenly in the lined pan. Bake at 350 degrees F for 30 to 35 minutes until the cake is golden and springs back gently when pressed. A toothpick should come out clean. Let cool in pan for 10 minutes before lifting out with parchment paper to a wire rack.
- Cool, Chill, and Shape Your Trees:
- Allow cake to cool completely, then chill for about 30 minutes before cutting. Press a Christmas tree cookie cutter firmly down to create sharp edged trees. Chilling minimizes crumbs and ensures tidy, bakery worthy shapes.
- Make the Buttercream:
- In a clean bowl, beat 1 cup unsalted butter with 5 cups sifted confectioner’s sugar on low speed, adding 4 to 5 tablespoons heavy cream until smooth and fluffy (about 2 to 3 minutes). Blend in 3 teaspoons vanilla and a quarter teaspoon salt for flavor and smoothness.
- Frost and Assemble:
- Generously frost each Christmas tree using a spatula or cake scraper, smoothing the buttercream on tops and sides. Chill for 10 minutes before applying the second layer for true Little Debbie cake thickness. Use water on your spatula for a smooth final finish.
- Decorate with Holiday Spirit:
- Sprinkle green sugar on each cake before icing sets, then pipe on thin red garland lines with red gel food coloring and a piping bag. For best color, decorate just before serving so your cakes look festive and vibrant until the moment they’re brought to the table.
I always finish my Christmas Tree Cakes with extra green sparkling sugar—my family loves racing to grab the biggest “tree” on the holiday platter and decorating their own treats. The first year I tried making these, my youngest discovered that using a small offset spatula made it much easier to smooth the frosting and create unique swirl patterns on each cake. It’s become a favorite holiday activity we look forward to every season.
Smart Swaps and Variations
You can switch all purpose flour for a gluten free baking blend on a one to one basis to suit gluten allergies, or choose plant based butter and dairy free milk for those who are dairy sensitive. Try swapping vanilla for lemon extract if you want a brighter flavor, or decorate with crushed candy canes instead of green sugar for a peppermint twist. For chocolate lovers, add two tablespoons of cocoa powder to the cake batter and top with chocolate sprinkles for a new holiday favorite everyone will remember. Extra cake scraps can be folded into cream for a fun Little Debbie Cake Dip at Christmas parties, making sure nothing goes to waste.
How to Store and Reheat Little Debbie Christmas Tree Cake
Store Christmas Tree Cakes in an airtight container in the refrigerator for up to four days to maintain freshness and prevent the frosting from smudging. For longer storage, freeze cakes in a single layer between parchment in a zip top bag for up to two months—thaw in the refrigerator overnight before serving. If making ahead, it’s best to decorate just before serving so the green sugar and red gel lines stay crisp and vibrant; store plain frosted trees undeclared and add finishing touches the day of your party. If transporting, insert a strip of parchment between each cake to protect decorations from sticking or smearing during travel.
What to Serve with Little Debbie Christmas Tree Cake
Pair these Christmas Tree Cakes with steaming mugs of hot cocoa or spiced chai for a cozy dessert spread that captures true holiday magic. For lighter parties, set out a citrus salad or fresh fruit tray to balance the sweetness. For an over the top Christmas treat, top each tree cake with a scoop of vanilla bean ice cream or arrange alongside other festive sweets like brownies and peppermint bark for a dessert buffet. Wrap smaller cakes in cellophane and tie with ribbon for gifting, or set up a decorating station so guests can create their own personalized tree to take home.
Nutritional Benefits
This Little Debbie Christmas Tree Cake recipe delivers a surprising boost of protein thanks to the eggs, making it more filling than many traditional holiday treats. Using real ingredients means you avoid artificial flavors and preservatives commonly found in boxed snacks, and the recipe can be easily adapted for gluten free or dairy free guests. Each serving averages around 430 calories, 15 grams of protein, 40 grams of carbohydrate, and 18 grams of fat, making it a manageable indulgence for special occasions—just remember to check all ingredient labels if serving to guests with specific allergies.
Recipe Success Tips
If you notice the cake crumbles while cutting shapes, ensure the cake is well chilled and use a small, sharp cookie cutter pressed straight down without twisting. If your frosting appears too thick, add cream a tablespoon at a time until smooth; if too thin, add extra sifted confectioner’s sugar to adjust. If you don’t have a stand mixer, a strong handheld mixer works well for creaming butter and sugar—just be sure to beat for the full three to five minutes for maximum lightness. Avoid skipping the chilling step or rushing assembly, as this helps maintain the cake’s structure for perfect Little Debbie style results every time.
This homemade Little Debbie Christmas Tree Cake is always the star of our holiday table, offering that bakery fresh texture and creamy filling everyone adores. Make it part of your family celebrations this year for a festive treat that’s as fun to decorate as it is to eat.
Common Questions About This Recipe
- → How do you get smooth buttercream for the cake?
Use room temperature unsalted butter and slowly add heavy whipping cream while mixing with an electric mixer or stand mixer. Beat until no lumps remain, and use a silicone spatula for even spreading.
- → Can I make this Little Debbie-inspired cake ahead of time?
Yes, you can prepare the cake and frosting a day in advance. Chill the cake and assemble before serving for best texture and freshness.
- → What creates the signature Christmas tree look?
Green sugar sprinkles and a touch of red gel food dye mimic the classic festive design. A frosting layer smoothed with a spatula completes the iconic tree cake appearance.
- → Is buttermilk necessary for the cake layers?
Buttermilk adds tenderness and lightness to the cake. If unavailable, substitute with milk plus 1 teaspoon vinegar or lemon juice mixed in.
- → Can I decorate the cake differently for other holidays?
Certainly! Change sprinkle colors or use different shaped cutters to adapt this festive cake for other celebrations and seasons.