
 Pin
Pin
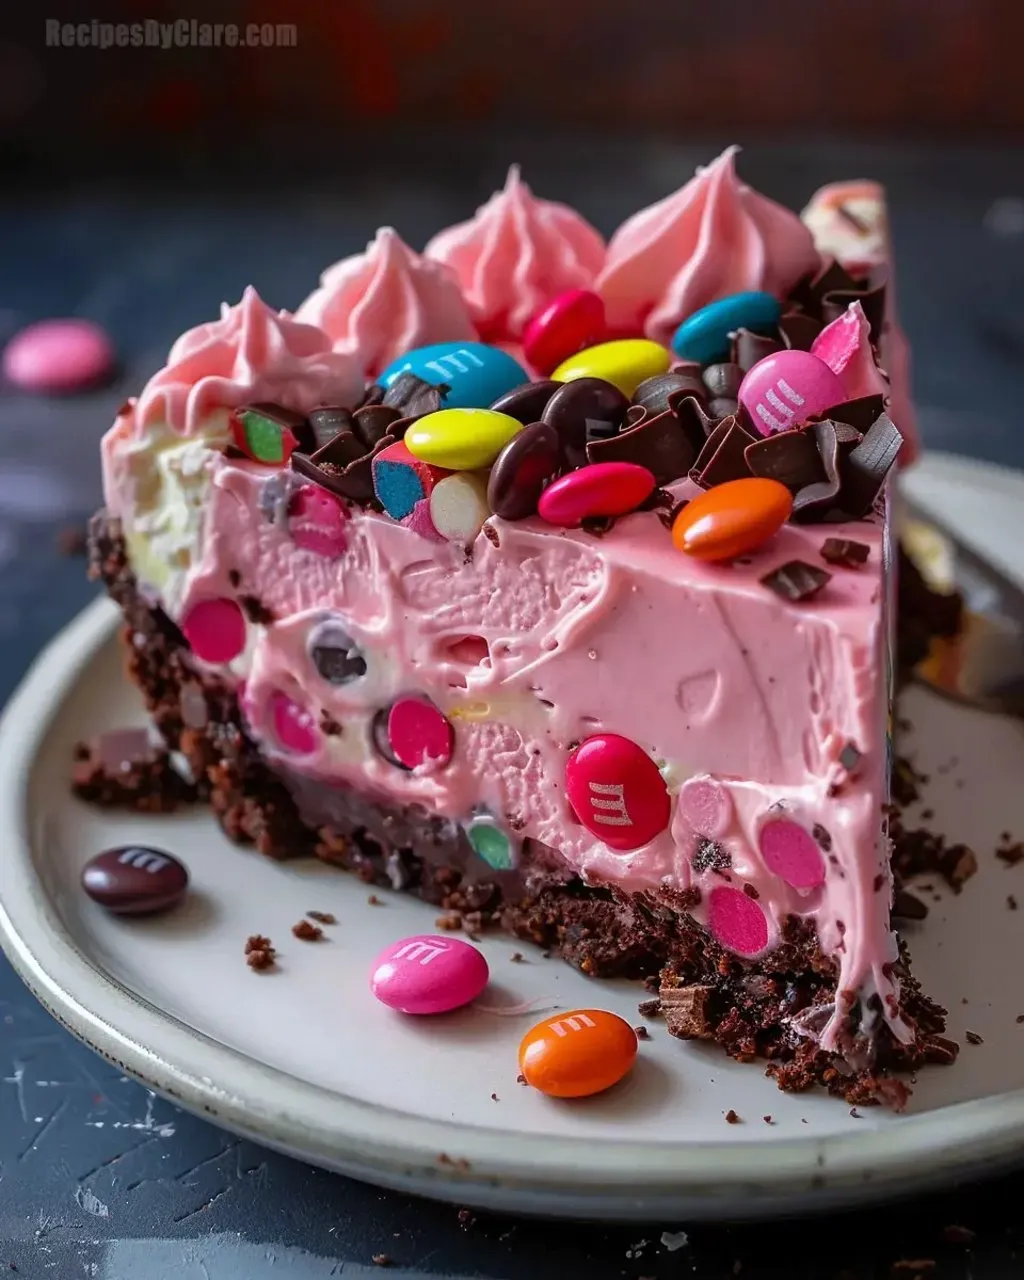
Dive into a pink, no-bake dessert that fuses Snickers and M&Ms for a wild, crowd-pleasing treat. You’ll get a creamy, chocolatey middle with playful pink color, and bursts of candy for extra sweet bites. It’s ideal when you want to wow pals, dodge the oven, or celebrate something special like Valentine’s Day or a birthday.
The first time I threw this together was for my niece’s birthday. Now it’s a must for every family hangout. The grownups are all about that candy flavor nostalgia, and the kids are obsessed with the bright pink.
Ingredients
- M&Ms on top bring extra color and a little crunch you can’t help but love
- Pink gel food coloring gives you that festive, fun look without making the batter watery
- Snickers bars chopped up add layers of caramel peanuts and nougat for texture in every bite
- Semi-sweet melted chocolate not only boosts flavor but helps the filling firm up, skip anything too sweet
- Cream cheese (go for full-fat) is the real MVP for tangy, smooth filling that tastes classic
- Crushed Oreos or graham cracker crumbs make a sturdy, crunchy bottom that supports all the creamy filling
Step-by-Step Instructions
- Decorate and Serve
- Run a thin knife along the edge before you pop the springform off. Pile on your candies or toppings right before serving so they look fresh. Slice with a hot wet knife for super clean pieces—it’s worth it!
- Assemble and Chill
- Drop your pink filling over the cooled crust in one go then smooth out the top with your spatula. Let it firm up at least 4 hours (overnight if you can)—so it slices up perfectly.
- Incorporate Whipped Cream
- Whip that heavy cream until it stands up in tall peaks. Gently fold this into your chocolatey mix for a light, airy filling.
- Add the Pink Color
- Take a scoop of batter and mix in some food coloring. Fold it back into your main mix so you can dial in the perfect pink. Remember, the color fades just a bit after adding whipped cream.
- Create the Filling Base
- Beat cream cheese first—get it silky smooth before anything else goes in, so you don’t get lumps. Powdered sugar melts in quickest. Stream in your melted chocolate as you keep mixing for even chocolate swirls.
- Melt the Chocolate
- Melt your chocolate slow and steady, stirring lots so it doesn’t scorch. Cool it till it’s just barely warm—this helps it blend in without weird clumps.
- Prepare the Base
- Smash cookies till they’re every bit fine. Blend in melted butter till it clumps like wet sand, then press into your pan using a cup. Chill this well so your crust really holds together.

Here’s the big trick: melting chocolate right into the filling. Most no-bake cheesecakes just set up with cold, but the chocolate helps everything hold firm—and tastes way richer. Learned this after my first cake crumpled. Now, smooth, sticky, magical every time.
Make-Ahead and Storage
This treat actually gets better after it hangs out in the fridge for a day or two—flavors get richer. Just leave those candy toppings off until showtime so they don’t get soggy. Keep leftovers chilled and covered for up to five days. Freeze singles by wrapping tight and tucking into freezer bags. Let them thaw in the fridge overnight when you want to dig in again.
Flavor Variations
Want to swap the pink? Try green gel with Mint M&Ms for holidays, or go orange and use Reese’s Pieces for a spooky Halloween vibe. Skip the color and stir in coffee liqueur for a grownup version (drop the vanilla a little). You can toss in any candies you want—this base works with everything.
Serving Suggestions
Set this beauty high on a cake stand and scatter berries around it for an extra punch. For birthdays, lay candles around the edge (softer filling means they won’t stay up in the center). Pour coffee or milk for casual hangouts, or bring out bubbly—champagne is awesome for cutting through the richness.
Troubleshooting Tips
Filling too runny? Stick it in the fridge 30 more minutes before pouring. If your chocolate goes weird and grainy, mix in a bit of oil and it’ll smooth out fast. Didn’t set after chilling? Just give it more time—some fridges are colder than others.
Common Questions About This Recipe
- → Could I swap out the base for something else?
Of course! You can switch the graham crackers or Oreos for vanilla wafers, digestive biscuits, or any crushed cookies that you love.
- → How do I get the filling nice and smooth?
Make sure your cream cheese is fully softened first. Beat it together with powdered sugar to eliminate any lumps before adding the rest of the ingredients.
- → Is it okay to leave out the food coloring?
Yes, that’s no problem! Skipping the food coloring is totally fine – you’ll still get a delicious dessert even without the pink color.
- → What if I don’t have Snickers?
You can use other chocolate bars like Twix or Milky Way. Or, mix in chopped nuts and caramel to mimic the texture and taste.
- → How long does it need to chill in the fridge?
Let it chill for at least 4 hours. If you can leave it overnight, the texture and flavor will get even better.
- → Can I prepare this ahead of time?
Absolutely. You can put this together 1 or 2 days in advance, then keep it in the fridge until it’s time to serve.