
 Save This
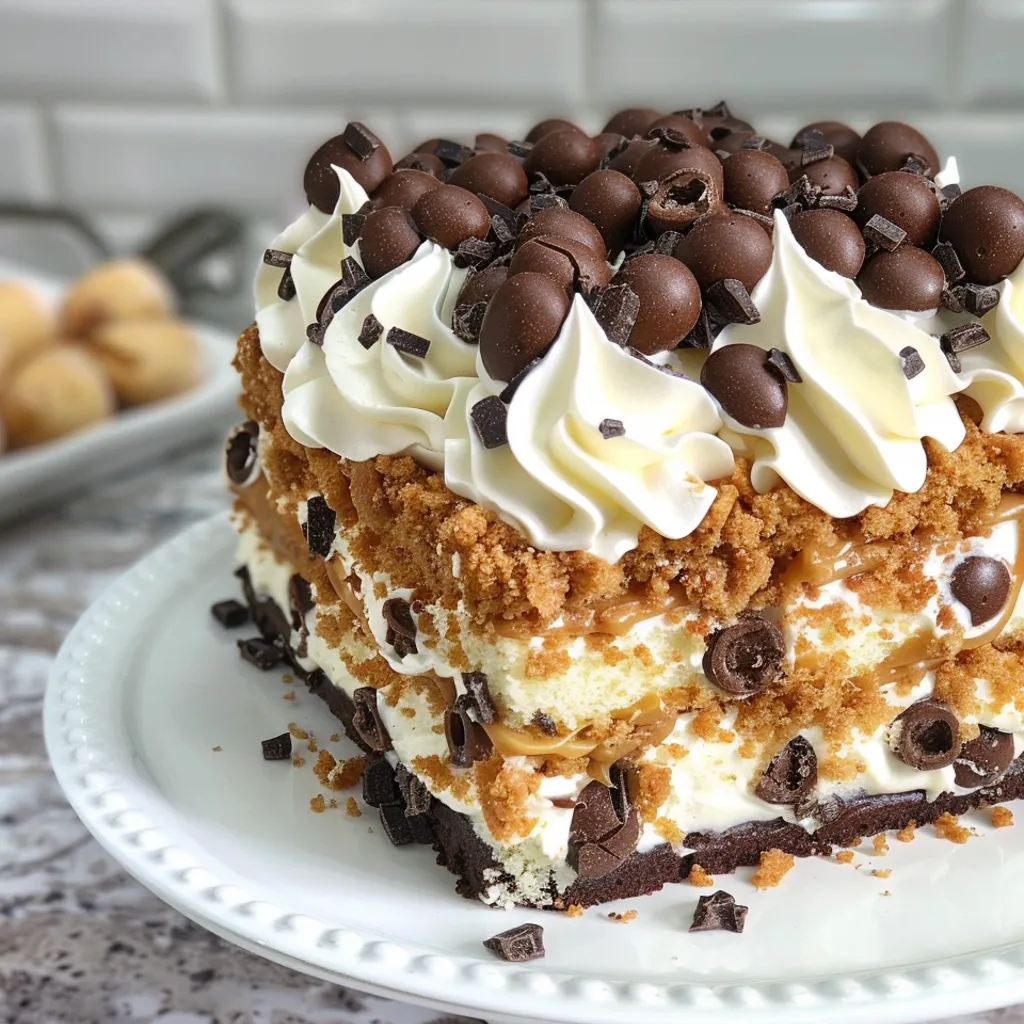
This Layered Cannoli Cake combines moist vanilla layers with a creamy ricotta-cannoli filling and a whipped cream finish. Perfect for celebrations or whenever you're craving the rich flavors of a classic Italian dessert!
I first made this cake for my mother's birthday after she mentioned missing authentic cannolis from her childhood in New York. The entire family devoured it within minutes and now it's our go-to celebration cake.
Ingredients
- All purpose flour: creates the perfect tender crumb for this layered dessert
- Baking powder: ensures a proper rise without overwhelming the delicate flavors
- Salt: balances the sweetness and enhances all the flavors
- Unsalted butter: at room temperature for proper creaming and texture
- Granulated sugar: provides just the right sweetness for the cake layers
- Large eggs: bind everything together and provide structure
- Vanilla extract: adds warmth and depth to the cake base
- Whole milk: creates moisture and richness in the cake layers
- Ricotta cheese: is the star ingredient providing authentic cannoli flavor
- Powdered sugar: sweetens without graininess
- Cinnamon: adds that classic cannoli warmth and spice
- Mini chocolate chips: add texture and chocolaty bursts in every bite
- Heavy cream: whipped to perfection creates a light finish to balance the rich filling
- Additional mini chocolate chips: for visual appeal and extra flavor
Step-by-Step Instructions
- Preheat Oven:
- Turn your oven to 350°F and prepare your workspace. Properly grease and flour two 8 inch round cake pans to ensure clean release after baking. The careful preparation here saves frustration later when removing the cakes.
- Mix Dry Ingredients:
- Combine flour, baking powder, and salt in a medium bowl with a whisk. This even distribution of leavening agents ensures your cake will rise uniformly. Whisking instead of sifting still incorporates air while mixing thoroughly.
- Cream Butter and Sugar:
- Beat butter and sugar together until the mixture turns pale and fluffy, taking at least 2 3 minutes. This process incorporates air which is crucial for a light texture. Add eggs one at a time, fully incorporating each before adding the next to prevent curdling. Stir in vanilla extract to infuse the batter with warmth.
- Combine Wet and Dry Ingredients:
- Alternate adding the dry ingredients and milk to the butter mixture, starting and ending with dry. This method prevents overmixing which can make your cake tough. Mix just until the ingredients come together for a tender crumb.
- Bake Cakes:
- Divide your batter evenly between the prepared pans and smooth the tops with a spatula for even baking. Bake for 25 30 minutes, checking with a toothpick for doneness. Allow cooling in pans for 10 minutes before transferring to a wire rack to cool completely. Patience here prevents cake breakage.
- Prepare Ricotta Filling:
- Mix ricotta cheese, powdered sugar, cinnamon, and mini chocolate chips until smooth and well combined. The filling should be thick enough to hold its shape when spread. This is the flavor heart of your cannoli cake.
- Assemble the Cake:
- Place one completely cooled cake layer on your serving plate. Spread half the ricotta mixture evenly across the surface, going almost to the edges. Place the second cake layer gently on top and spread the remaining ricotta mixture. The even distribution ensures every bite has the perfect ratio of cake to filling.
- Whip Cream:
- In a chilled bowl, whip the heavy cream until stiff peaks form. Using a cold bowl helps the cream whip faster and hold its shape longer. Whip just until the cream stands in firm peaks when the beater is lifted.
- Finish the Cake:
- Spread the freshly whipped cream over the top and sides of the cake with a spatula, creating a smooth or textured finish as desired. Garnish with additional mini chocolate chips for that classic cannoli appearance and extra texture.
- Chill and Serve:
- Refrigerate the assembled cake for at least one hour before serving. This chilling time allows the flavors to meld and the layers to set properly for clean slicing. Use a sharp knife dipped in hot water for the cleanest cuts.
 Save This
The mini chocolate chips are truly magical in this recipe. When I first developed this cake, I used regular sized chips and found they overpowered the delicate ricotta filling. The mini chips distribute perfectly throughout each bite, giving you that authentic cannoli experience without dominating the other flavors.
Storage Guidance
The assembled cake stays fresh in the refrigerator for up to three days when stored in an airtight container. The flavors actually develop and improve after the first day as the moisture from the filling subtly infuses the cake layers. For longer storage, you can freeze individual slices wrapped tightly in plastic wrap and aluminum foil for up to one month. Thaw in the refrigerator overnight before serving.
Make Ahead Options
Each component of this cake can be prepared ahead of time to make assembly quick and easy. The cake layers can be baked up to two days in advance and stored wrapped in plastic at room temperature. The ricotta filling can be prepared up to 24 hours ahead and kept refrigerated. Just whip the cream fresh before assembling for the best texture and stability.
Serving Suggestions
This cannoli cake is delicious on its own but pairs beautifully with a shot of espresso or a glass of sweet dessert wine like Moscato. For an extra special presentation, dust the top with additional cinnamon or cocoa powder just before serving. Consider adding a few fresh berries on the side for a pop of color and freshness against the rich cake.
Cultural Background
Cannoli are traditional Sicilian pastries consisting of tube shaped shells filled with sweetened ricotta. They originated in Palermo and were historically prepared for Carnevale celebrations. This cake transforms the beloved street food into an elegant dessert while maintaining the signature flavors. The combination of ricotta, chocolate and cinnamon is deeply rooted in Italian culinary tradition, where simple quality ingredients are allowed to shine.
Common Queries
- → How do I ensure the ricotta filling is not runny?
Drain the ricotta well before using. You can do this by placing it in a cheesecloth-lined strainer and refrigerating for several hours or overnight. This step helps create a thick, stable filling.
- → Can I bake the cake layers ahead of time?
Yes, bake the cake layers in advance and let them cool completely. Wrap in plastic and store at room temperature for a day or freeze for longer storage. Assemble just before serving.
- → What garnishes work well with this cake?
Mini chocolate chips, crushed pistachios, or grated chocolate add flavor and visual appeal to the cake. Choose your favorites to match the occasion.
- → How should I store leftovers?
Keep any leftovers covered in the refrigerator for up to three days. The cake may firm up as it chills, but will remain moist and flavorful.
- → Can I make this dessert gluten-free?
Substitute the all-purpose flour with a gluten-free blend designed for baking. Check other ingredients for gluten content as needed.